Configuration
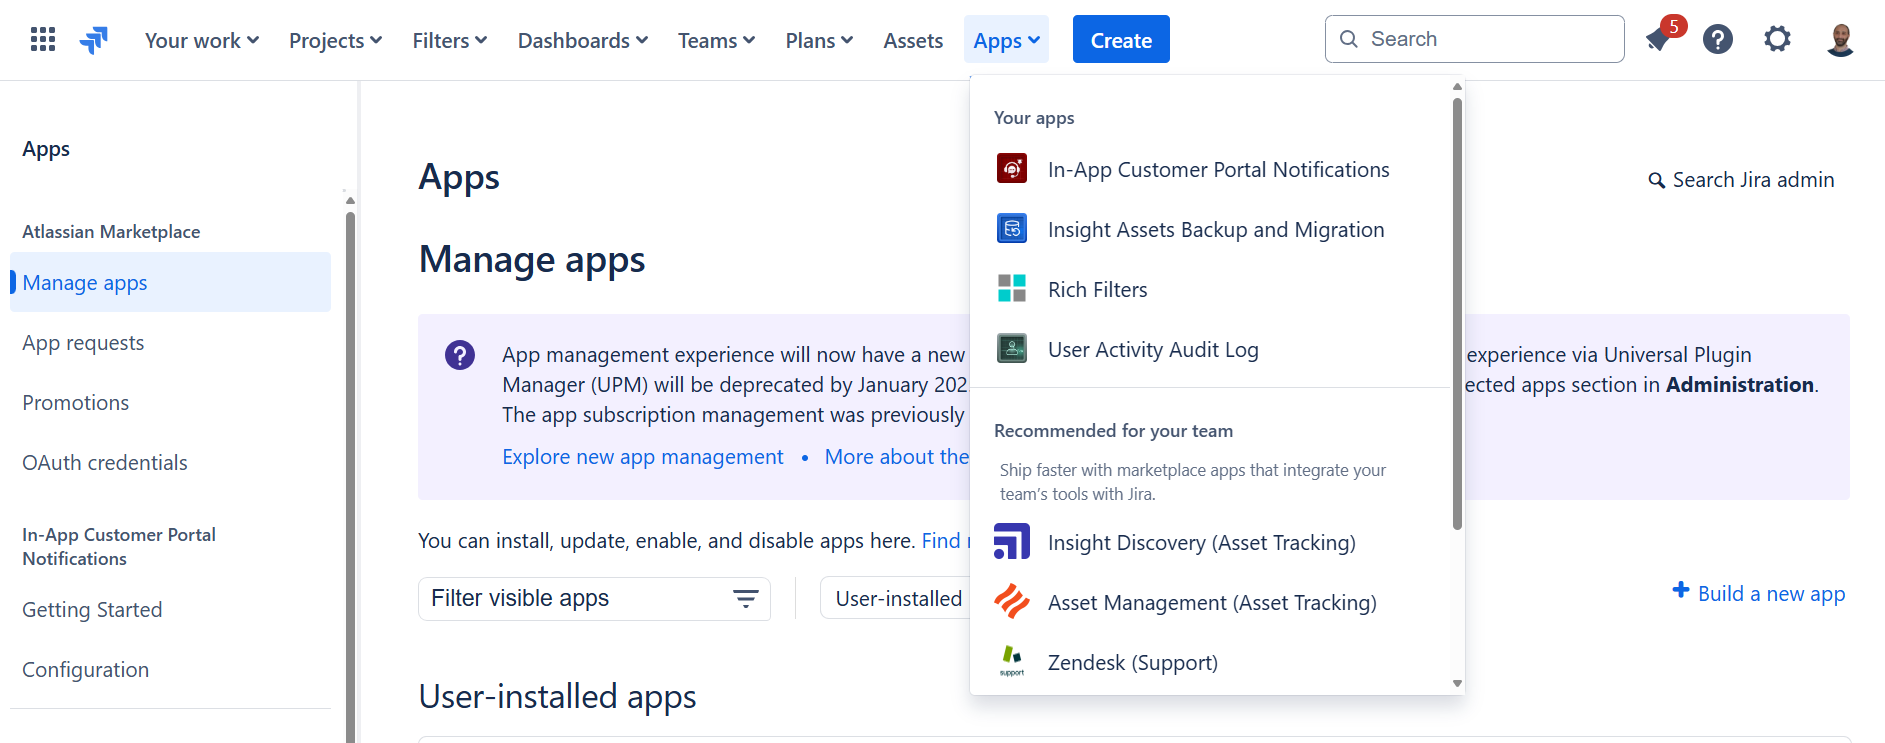
After installation, the Customer Portal Notifications app is available in the “Apps” administration menu:
After clicking the Customer Portal Notifications, the user will be navigated to the configuration page:
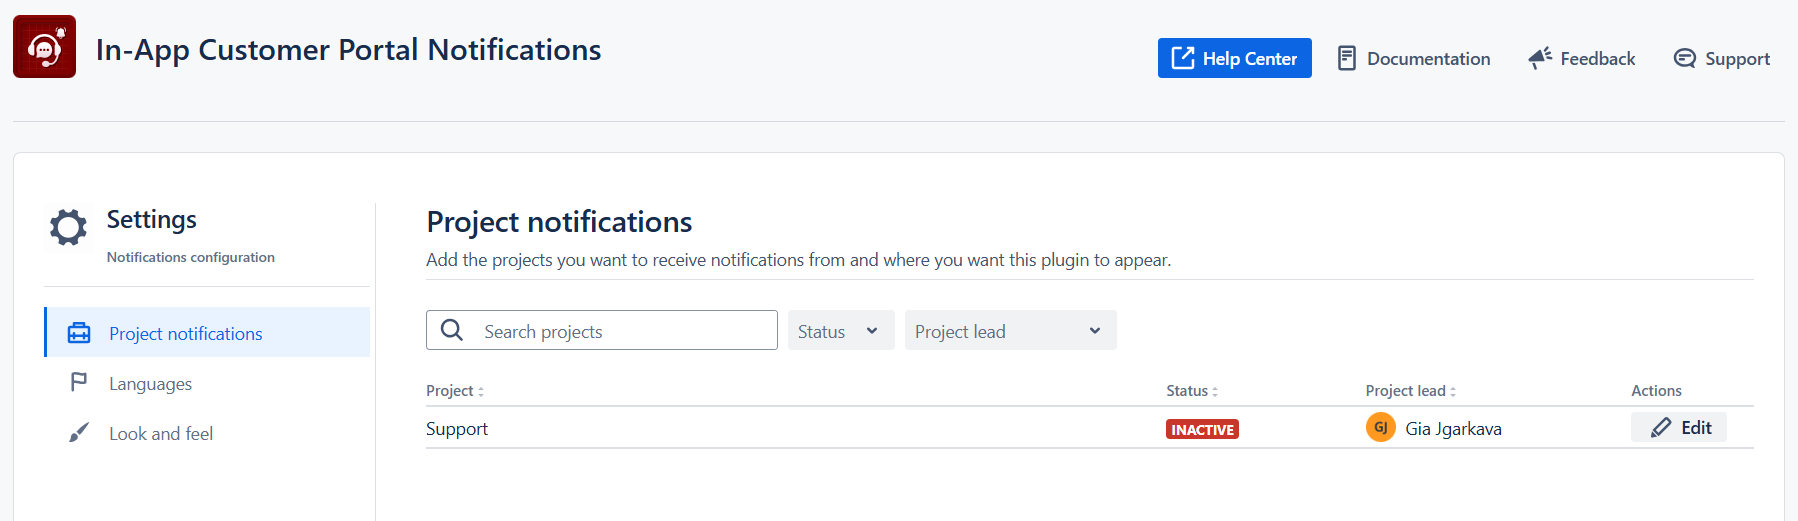
From the top ribbon, you can directly navigate to the:
- Help Center: the customer portal of your cloud instance (https://[yourinstance].atlassian.net/servicedesk/customer/portals).
- Documentation: Detailed instructions on the configuration and usage of the app.
- Feedback: Reviews page on the app’s Marketplace Listing.
- Support: Open a ticket to the Twinit’s Service Desk.
Wherever you are in the configuration, clicking the logo and the name of the app will navigate you to the landing page of the configuration (list of the projects).
You can sort the project list by Project name, Status and Project lead.
Settings
The landing page (Settings) shows a sidebar with Project notifications, Languages and Look and Feel.
Project Notifications
After installation of the app, all the JSM projects from the Cloud instance will be automatically added to the Settings:
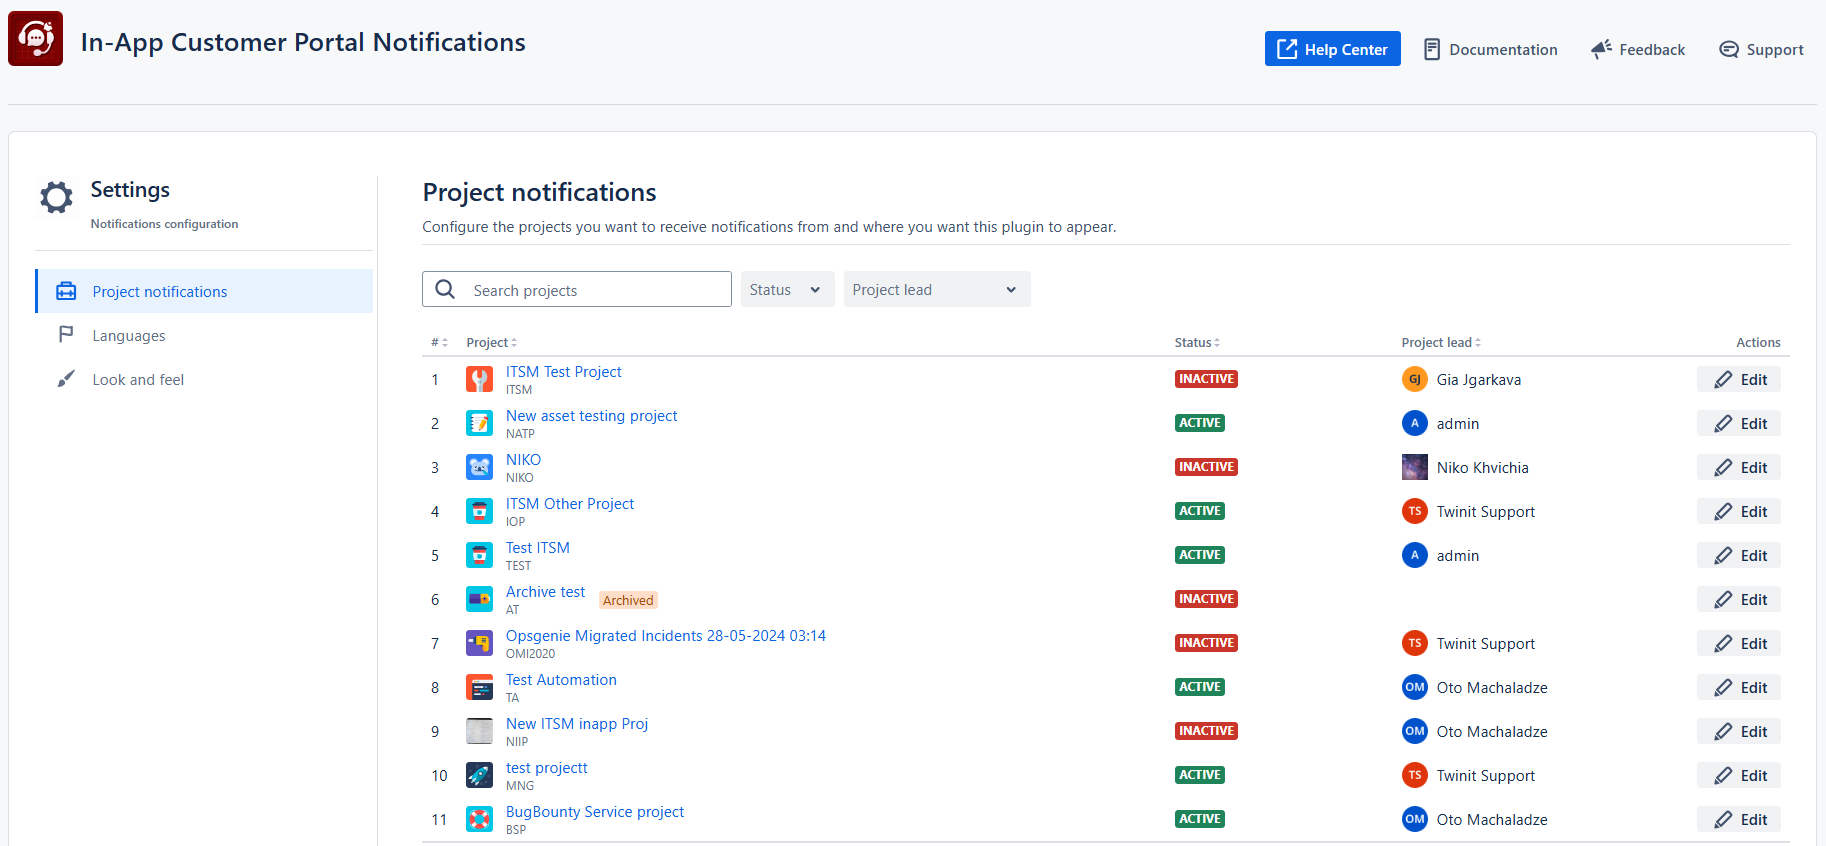
The following information and actions are available for the projects:
Project:
Project icon
If the project is deleted the project will have the “trash bin“ icon and “Deleted“ label.
If the project is archived the project will have an “Archived“ label.
- When the project is restored from the archive, updating the icon and the label may take up to 15 minutes.
Project name: clicking the row will navigate you to the project notifications setting in the app
Project key
Status: “Active” (green) or “Inactive” (red)
- You can filter the projects by the statuses with the filter above
Project Lead: the user, which is indicated as a Project lead in the JSM Project settings
- You can filter the projects by the Project lead names with the filter above
- If the project is archived or deleted, the project lead will not be visible
Actions/Edit: configure settings for the project (see below)
Search: you can search the projects by names
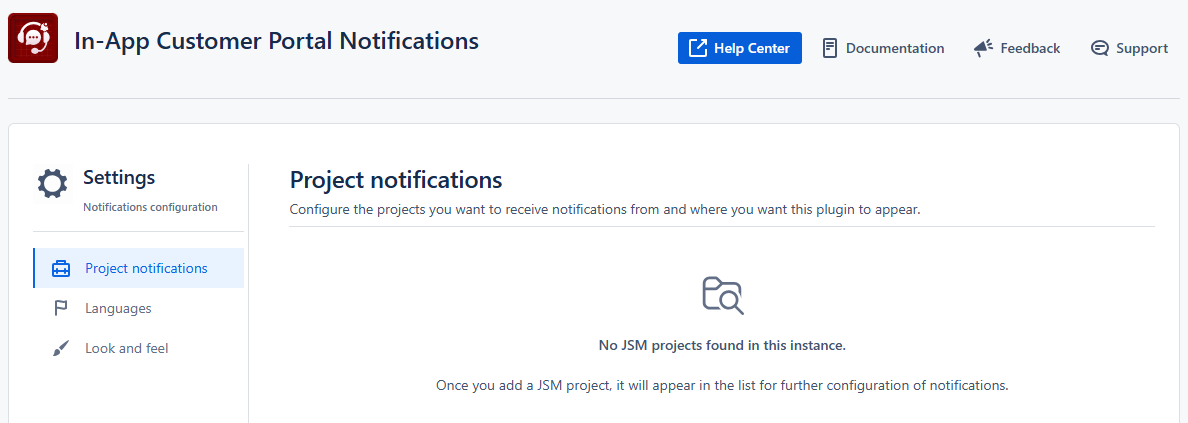
If there are no JSM projects in the instance, you will see the corresponding message:
When the project is deleted, it will disappear from the list after the project is deleted from the trash! While in trash, the projects will be still visible in the list with the default “trash” icon:
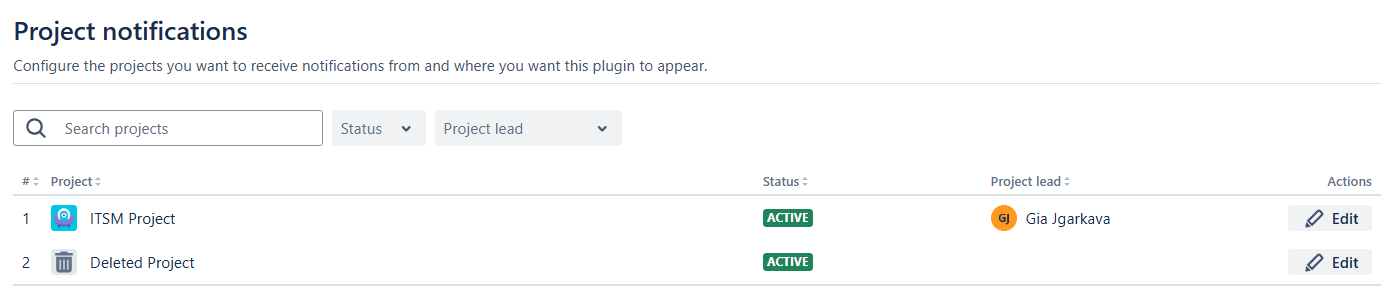
The projects created before the installation of the app on the instance, the projects in trash will still have the original icon.
Project Edit
With the “Edit“ button below the Actions, you will be navigated to the Project notifications settings:
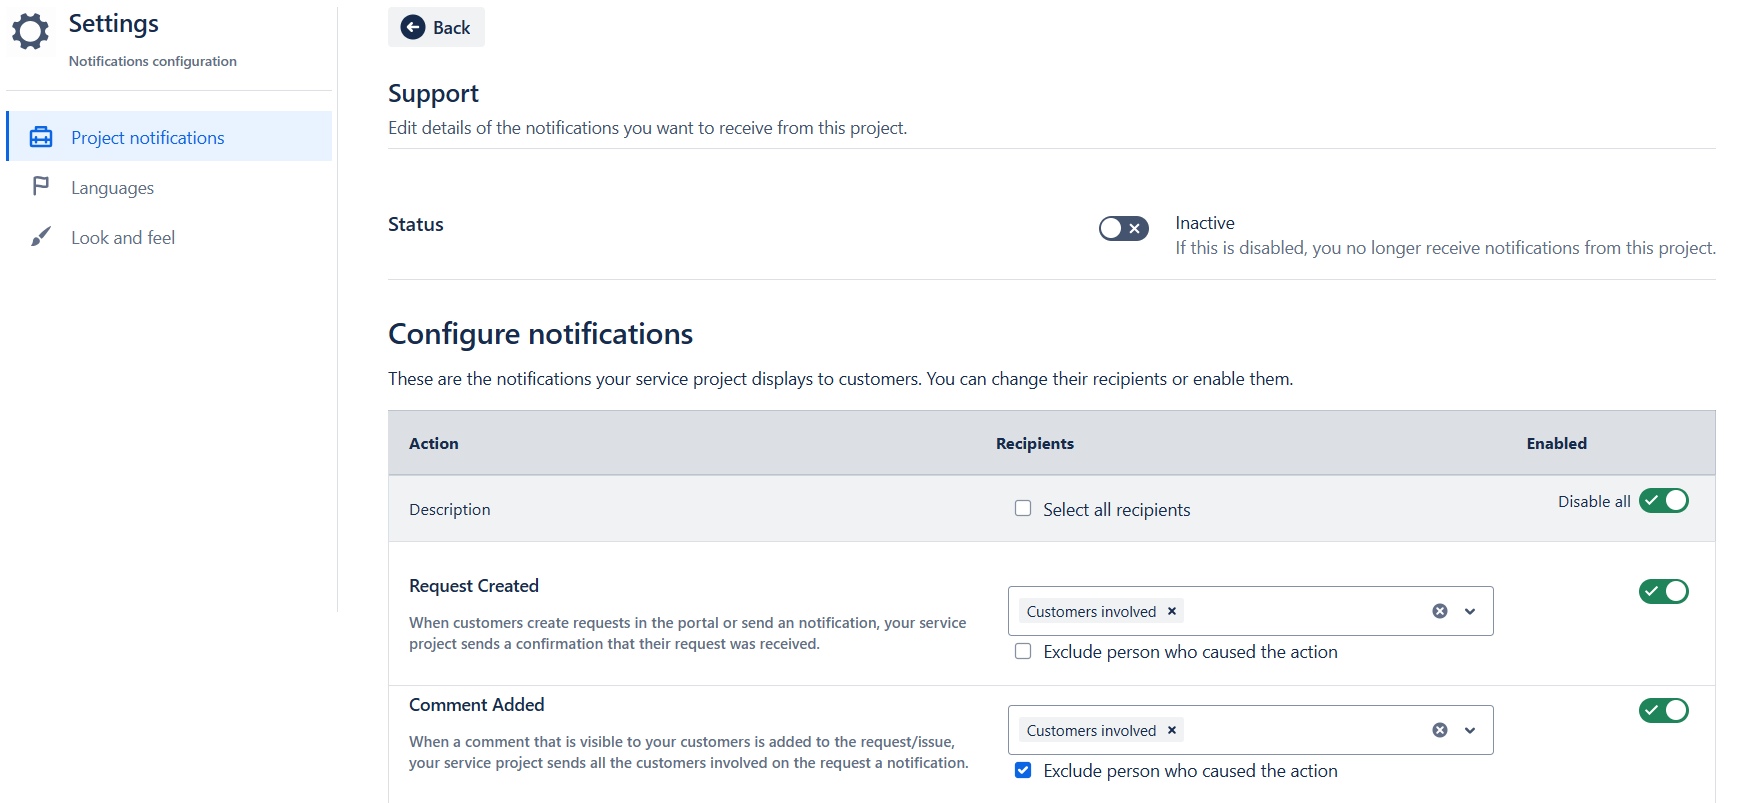
By toggling on or off the Status you can enable (Active) or disable (Inactive) receiving the notifications from the selected project.
Configure Notifications
Below you can enable, disable and configure the notifications on certain actions for specific recipients:
The following actions can be enabled:
Request Created
- When customers create requests in the portal or send an notification, your service project sends a confirmation that their request was received.
Comment Added
- When a comment that is visible to your customers is added to the request/issue, your service project sends all the customers involved on the request a notification.
Comment Edited
- When a comment that is visible to your customers is edited, your service project sends all the people involved on the request a notification.
Request resolved
- When a request resolution field is set, your service project notifies the reporter and all customers involved. This notification is sent to the reporter even if they have turned off notifications for a request.
Request reopened
- When a request’s resolution field is cleared, your service project notifies all people involved.
Participant added
- When participants are added to a request, your service project notifies the new participants.
Organization added
- When a request is shared to an organization, your service project notifies the organization’s members so they can opt-in to further updates.
Approval required
- When a request transitions to an approval stage of its workflow, your service project notifies approvers that they must act on the request.
Status change
- When a request transitions, your service project notifies the customers involved.
From the select field to the right of the action you can select the recipients for the actions:
Customers involved
- The Customers involved in the notification are all customers who opted in to receive notifications.
Request participant
- The users who are added as Request participants in the tickets
Added participant
- The users who were added as participants in the request
- Can be added only to the Participant Added action
Organizations
- All the users added to the organization of the request
Added Organizations
- All the users for the organization, that are added to the request will receive the notifications
- Can be added only to the Request Created and Organization Added actions:
Reporter
- The request reporter will receive the notification
Approvers
- The users who are added as Approvers in the request will receive notifications
- Can be added only to the Approval Required action
If you check the Select all recipients checkbox, all the recipients will be selected in the recipients select list for all the actions.
If the user has set the notifications off from the portal, but is added in the notification configuration in the app, they will still receive the notification in the app.
If you check the Exclude person who caused the action checkbox, the user who has triggered the action will not receive the notification, even if the user is added in the recipients.
Fields monitoring
You can configure the app to receive notifications when certain fields are updated:
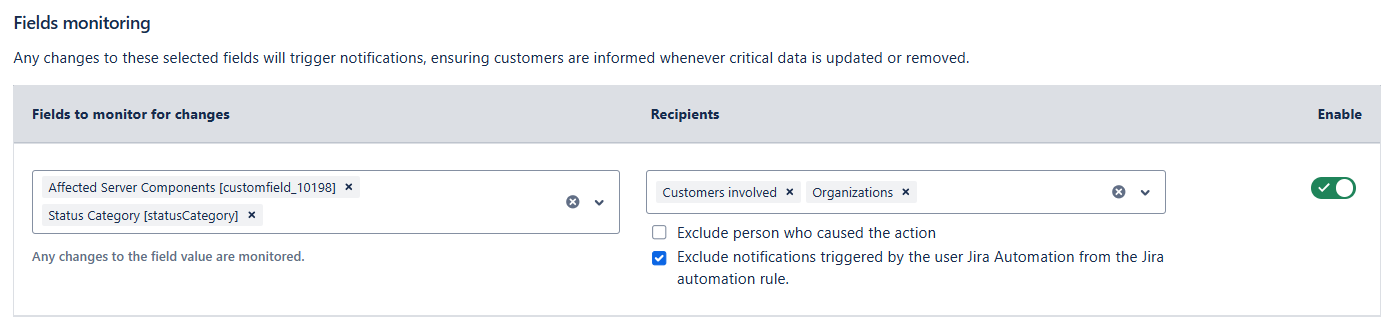
You can select the fields under the “Fields to monitor for changes“ and the selected recipient will receive a notification when the field values are changed. All standard and custom field types are supported, including Asset custom fields.
The possible recipients can be:
- Customers involved
- Request participant
- Organizations
- Approvers
- Reporter
Additionally, by selecting the corresponding checkboxes you can select to “Exclude person who caused the action“ and “Exclude notifications triggered by the user Jira Automation from the Jira automation rule“
After selecting the fields monitoring options, click “Save changes“ button at the end of the page to save the settings.
Display
Here you can enable or disable the visibility of the notifications bar on the Customer portal:
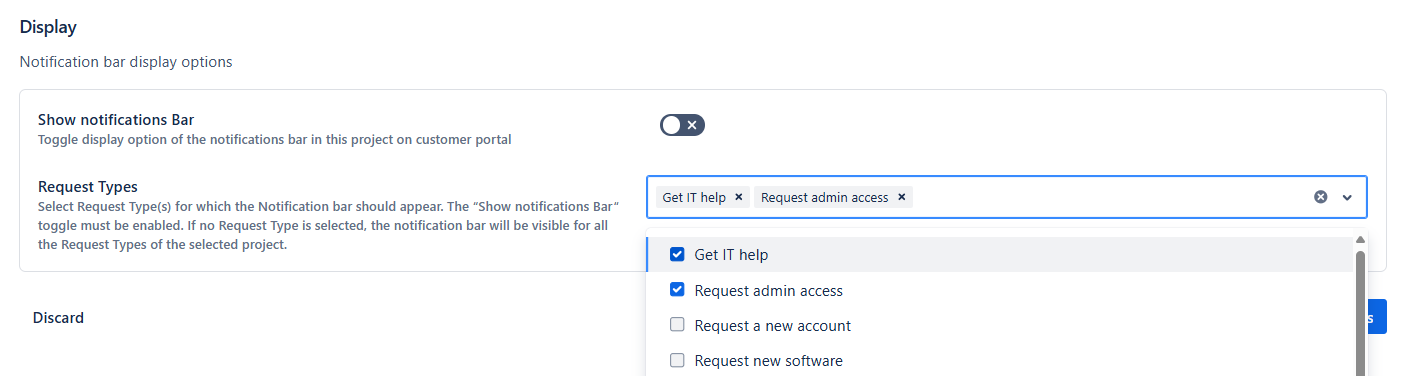
Show notifications Bar
- Enabling the toggle will display the notifications bar in this project on the customer portal.
Request Types
- Select Request Type(s) for which the Notification bar should appear. The “Show notifications Bar“ toggle must be enabled. If no Request Type is selected, the notification bar will be visible for all the Request Types of the selected project.
After you done all the necessary modifications, you need to click the “Save changes” button to save all the settings.
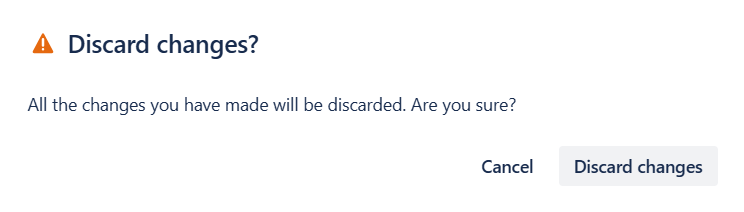
You can also discard all the changes by clicking the Discard button. You will see the confirmation popup:
With the initial installation of the app, all the JSM projects added to the app will have the following default configuration:
Request Created
- Recipients: Customers involved
- Exclude person who caused the action: unchecked
Public Comment Added
- Recipients: Customers involved
- Exclude person who caused the action: checked
Public Comment Edited
- Recipients: Customers involved
- Exclude person who caused the action: checked
Request resolved
- Recipients: Customers involved
- Exclude person who caused the action: checked
Request reopened
- Recipients: Customers involved
- Exclude person who caused the action: checked
Participant added
- Recipients: Customers involved and Added participants
- Exclude person who caused the action: checked
Organization added
- Recipients: Customers involved and Added organizations
- Exclude person who caused the action: checked
Approval required
- Recipients: Approvers
- Exclude person who caused the action: checked
Status changed
- Recipients: Customers involved
- Exclude person who caused the action: checked
Show notifications bar: Enabled
Request Types: None selected
Languages
From the Languages tab in the left sidebar, you can translate your customer portal notifications bar into multiple languages for the customers.
If their preferred language is not available, they will see the default you select.
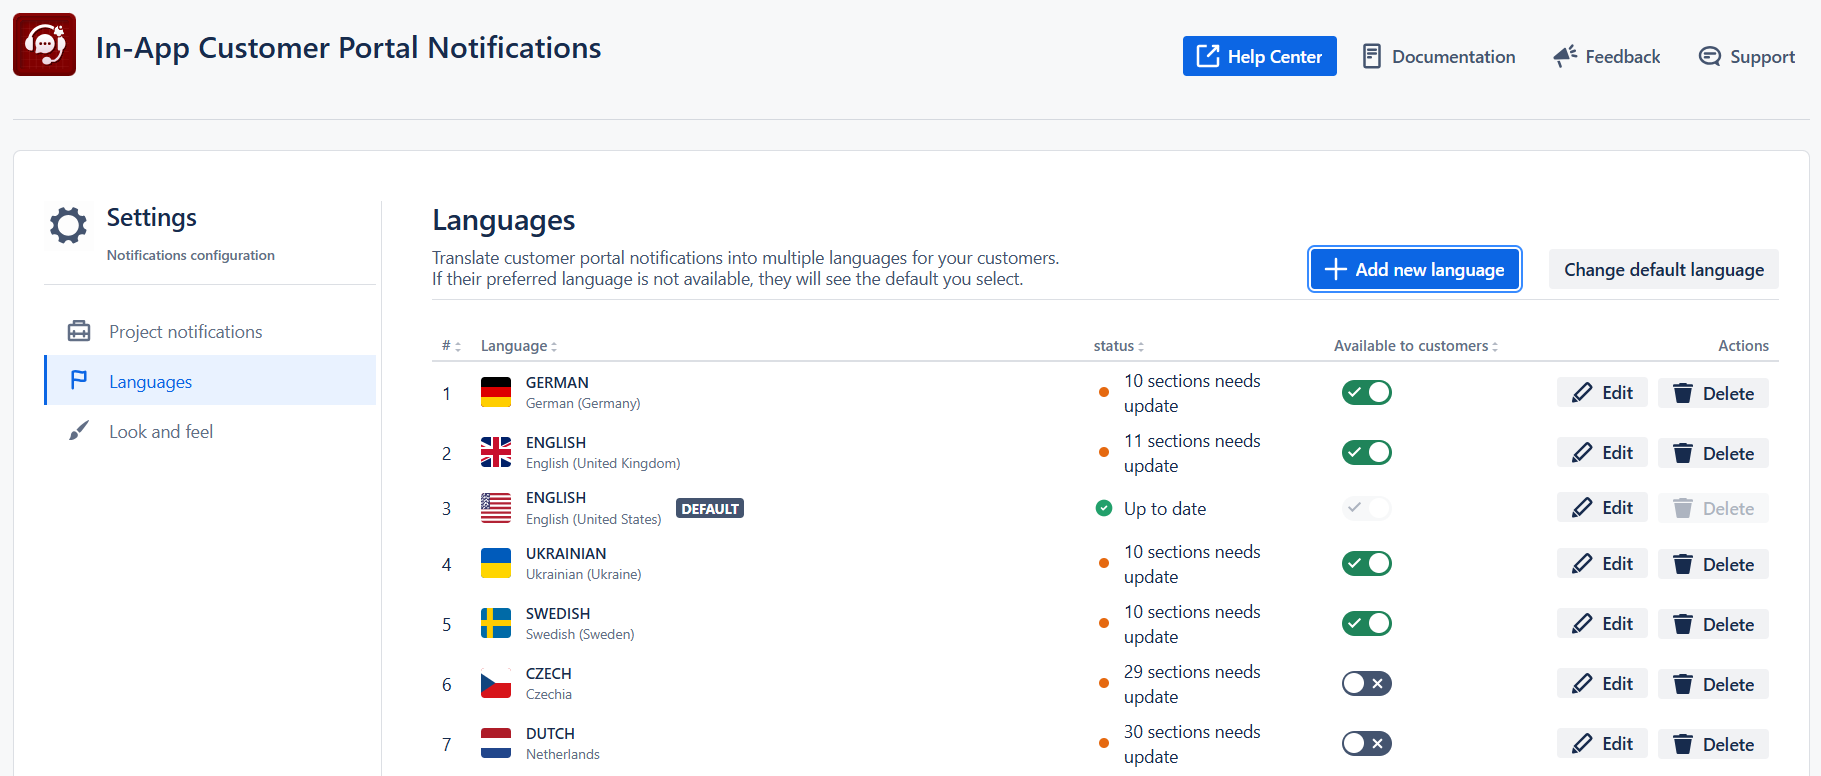
The following information and actions are available for the Language tab:
“Add new Language” button
Change default language button
#: ordering number
Language: Language name (as indicated in the Jira instance) and the country flag
Status: status of the translations, whether all the terms are selected or not
“Available to customers” toggle: changing this toggle will enable or disable the language on the customer portal.
- The default language cannot be disabled
Edit: clicking the “Edit” button will navigate the user to the translation page for the selected Language (see details below)
Delete: clicking the “Delete” button will delete the Language
- The default language cannot be deleted
To add a new language, click Add new languages button, check the desired language from the popup button, and click “Add selected languages“:
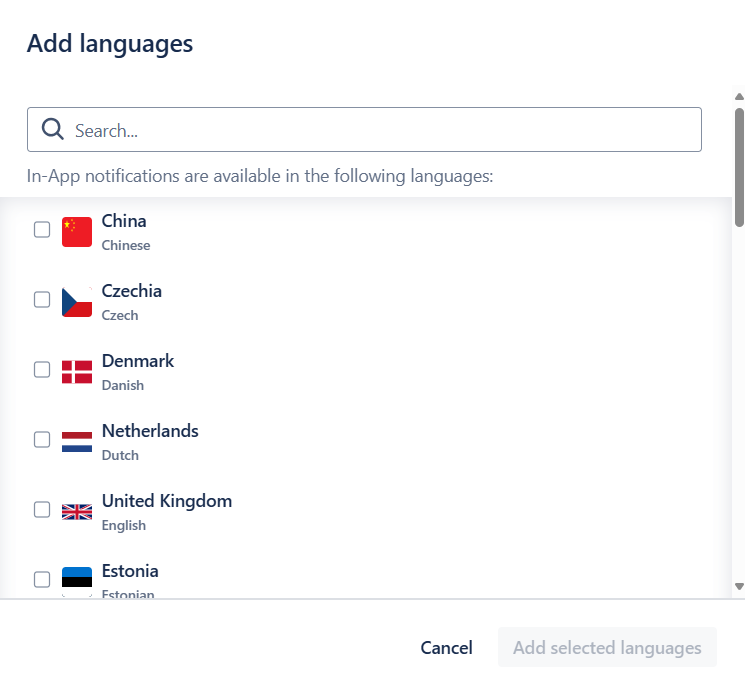
Here you can search the language by name or by country.
the list will show only the languages that are not yet added to the app.
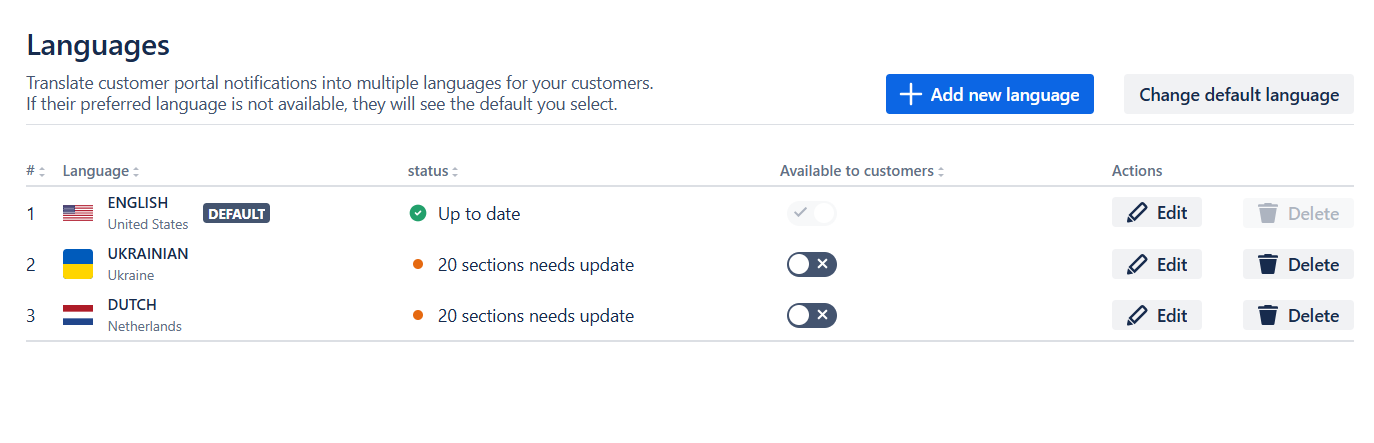
After clicking the “Add selected languages” button, the selected language will be added to the languages grid:
Translate Language (Edit)
Click the “Edit” button for the added language to translate certain terms into the selected language:
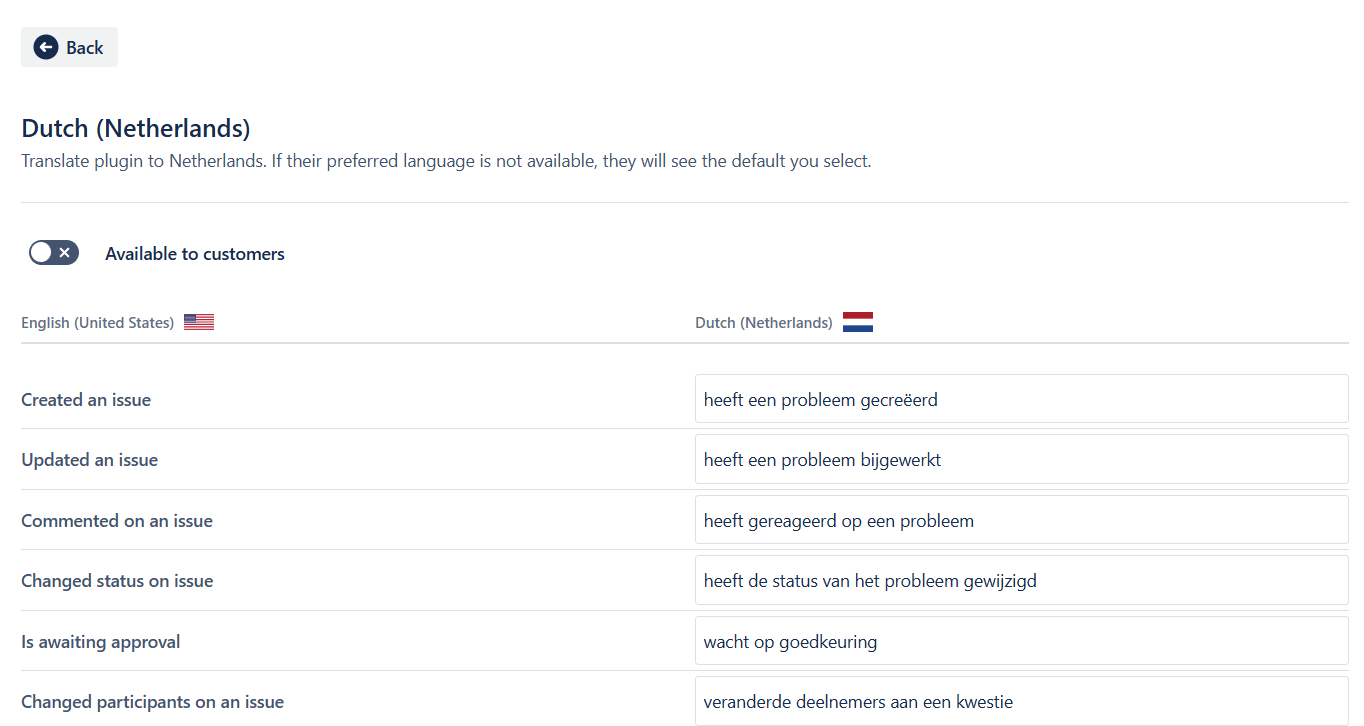
All the terms in the notifications bar can be translated into the desired language:
Issue notifications
Created an issue
Updated an issue
Commented on an issue
Changed status on issue
Is awaiting approval
Changed participants on an issue
Reopened an issue
Resolved an issue
Updated comment on an issue
Updated %field% in an issue
- Please use %field% in the translated text to show field name in the notification.
- See the Configuration | Fields monitoring for more details
Actions and information
- Show only unread
- Show all
- Marked all as read
- No more notifications
- No New Notification
- Open in a new tab
- Mark as unread
- Mark as read
Notification filters
- All
- Created by me
- I am participant
- My organizations
- Waiting for my approval
- Confluence
Confluence notifications (to receive these notifications, Customer Portal Notifications for Confluence app should be installed on the same instance)
- Updated page
- Commented on page
- Update comment on page
- Mentioned you in comment on page
- Mentioned you in line comment
- Mentioned you in page content
After filling the translations, click Save changes.
Change Default Language
Customers can see the notifications in the default language if:
- You haven’t added their preferred language into the app
- Their preferred language is disabled
Before trying to change the default language:
- Review and confirm the language’s translations, so they are up to date
- Enable the language
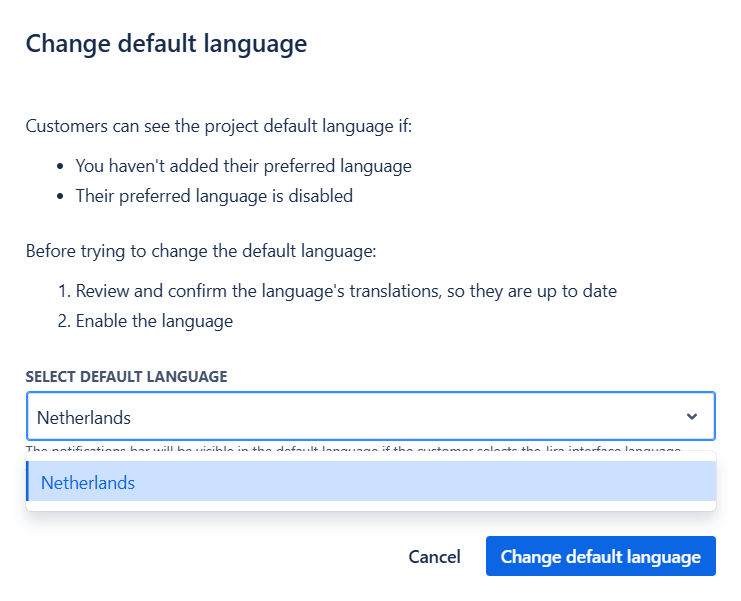
You can change the default language by clicking the Change default language button. You will see the following popup:
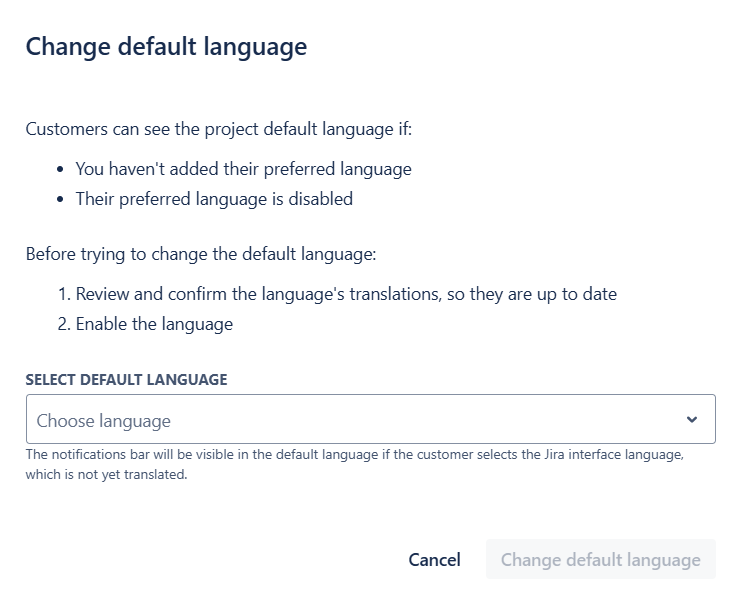
In the dropdown, you will see the list of the languages that are added to the app, enabled and all the sections are translated. The current Default language will not be displayed:
Changing Language in Customer Portal
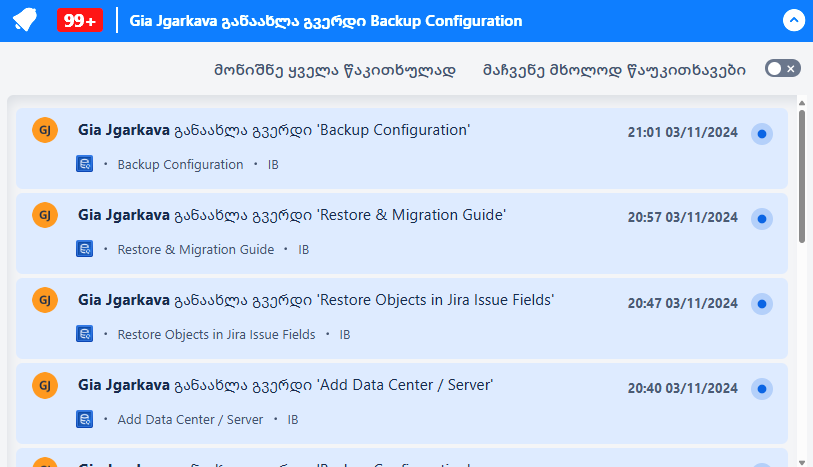
To show the content of the notification bar in the desired language, the customers should set the Portal preferred language.
Refer to the following Atlassian documentation for the instructions: Let customers know how to set their language preference | Jira Service Management Cloud | Atlassian Support.
Notifications bar will be displayed in the selected language only if the language is already added to the translations list of the plugin settings (see Languages for more details). If the selected language is not yet added to the plugin configurations, the default language will be used.
After changing the profile language to the desired one, the content of the notifications bar will be displayed in the selected language:
Look and Feel
From here you can modify the notification bar theme, style and size; date/time format, colors and sound settings:
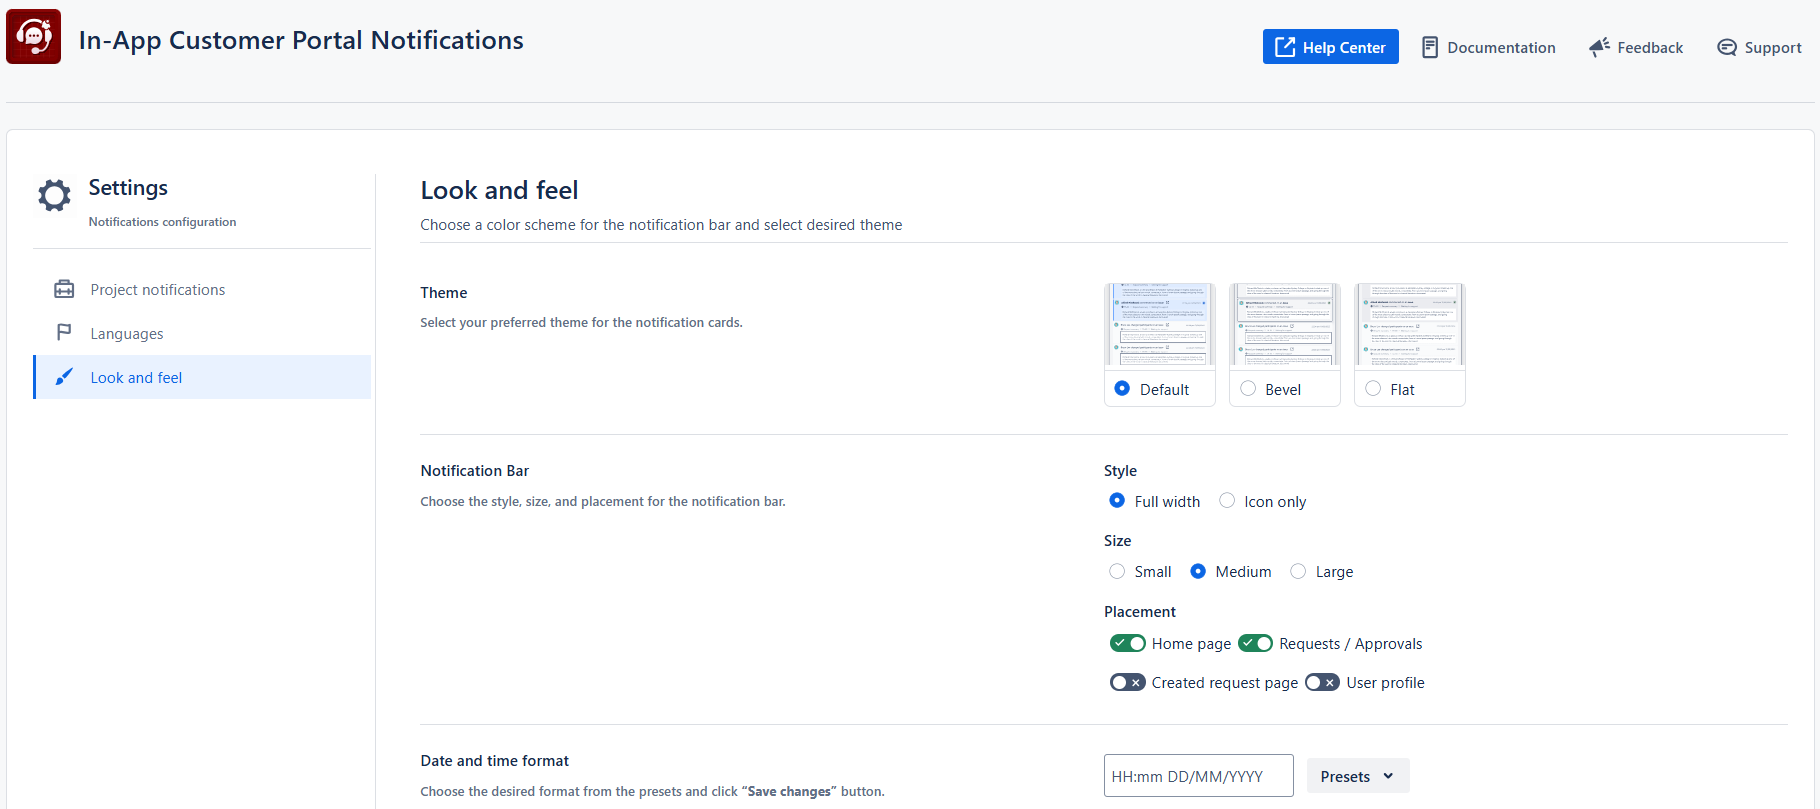
Theme
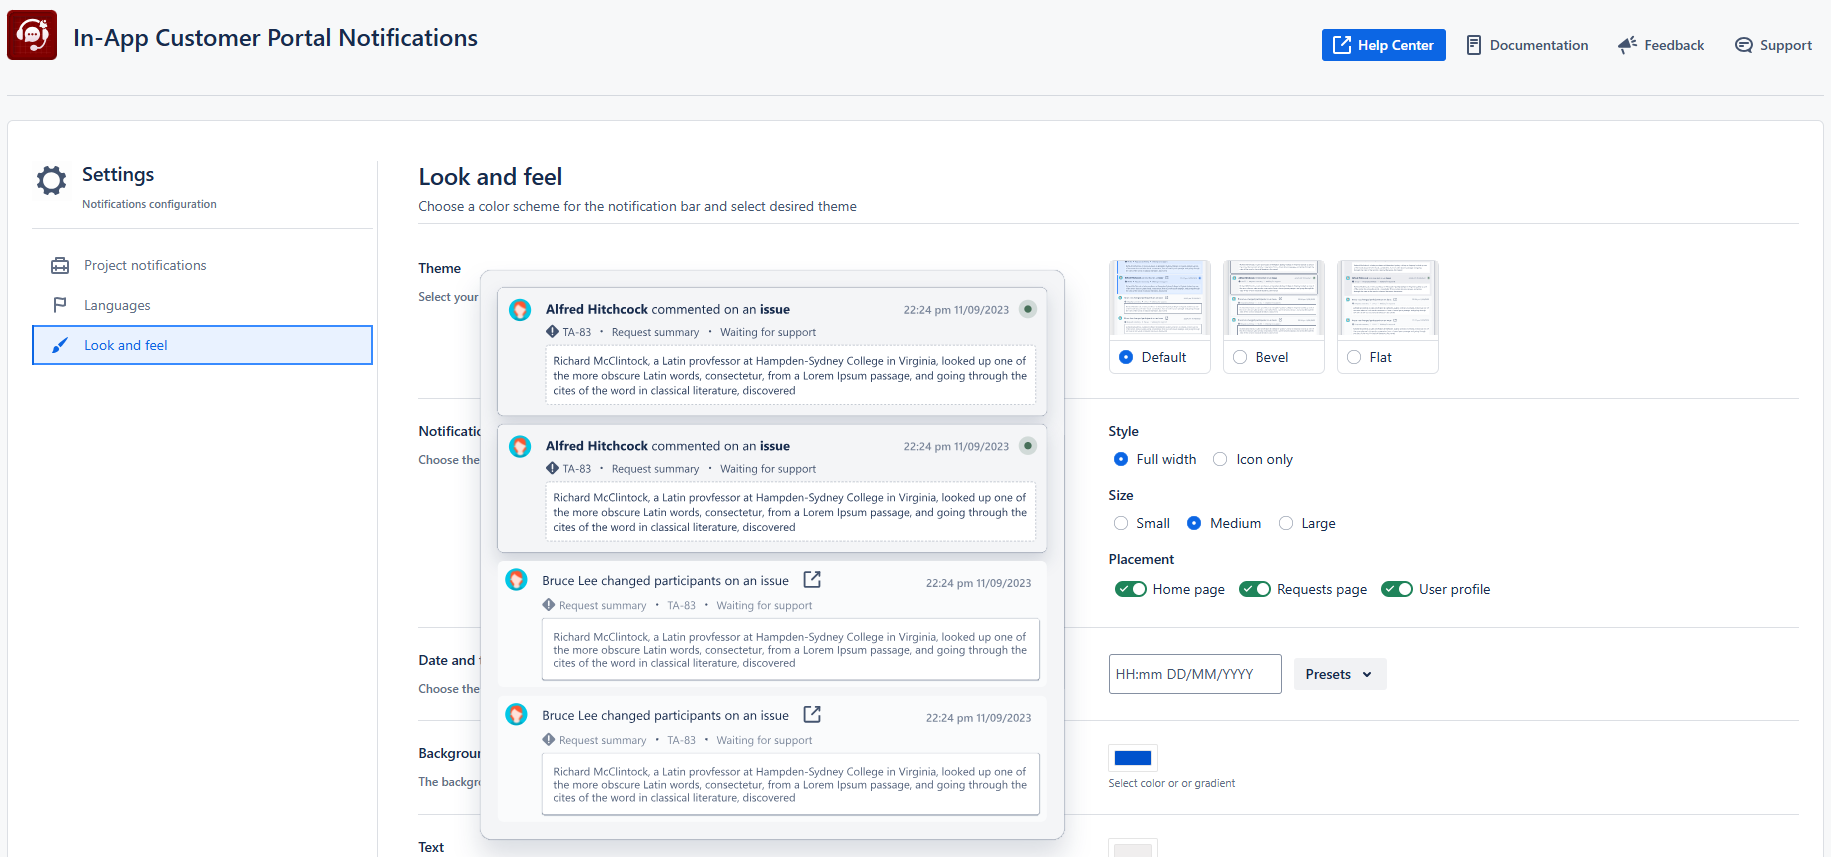
You can choose between three various types of notification bar themes, that define various visual representations of the notifications bar on the customer portal:
- Default
- Bevel
- Flat
You can preview each theme by hovering the mouse on the certain theme:
Notification bar
From here you can define the style. size and placement of the notifications bar:
Style
- Full width
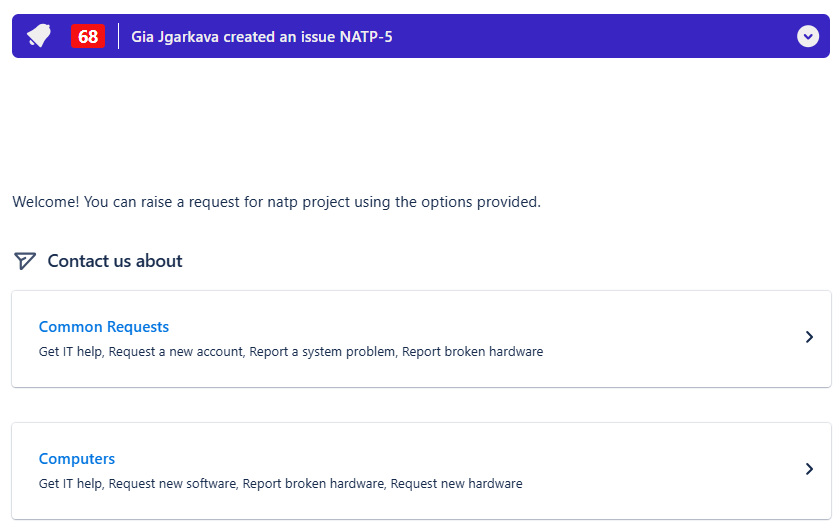
Icon only
Size: the size of the bar itself and the font
- Small
- Medium
- Large
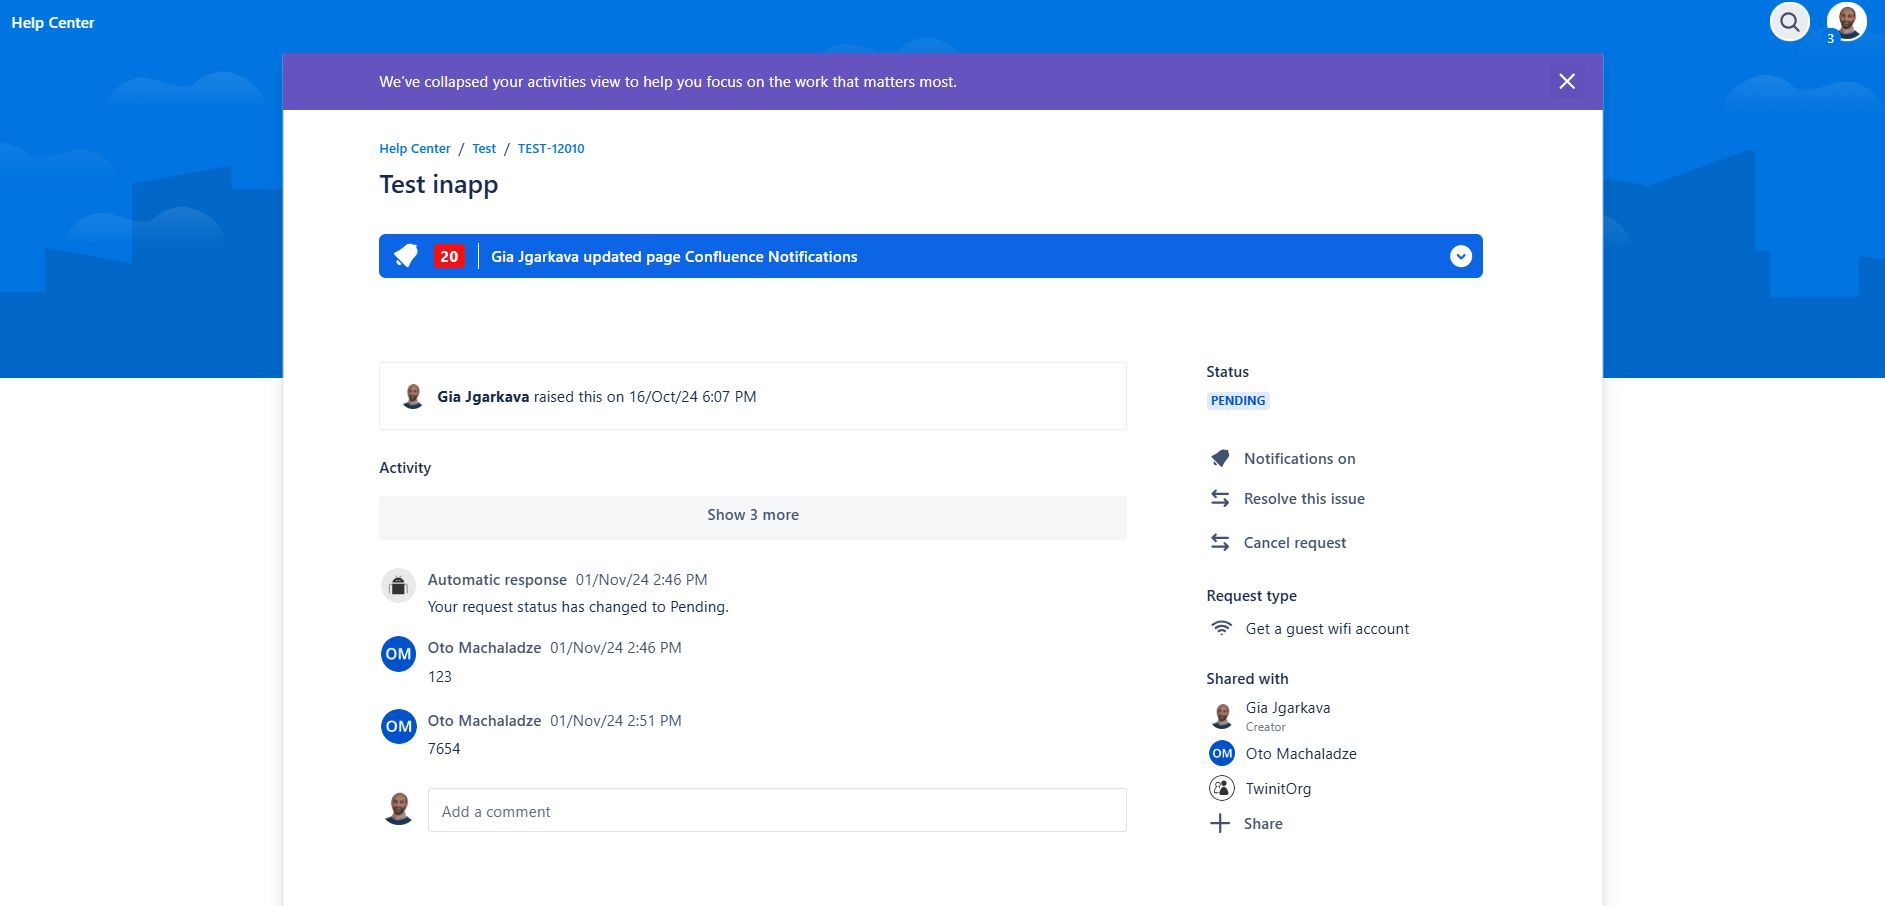
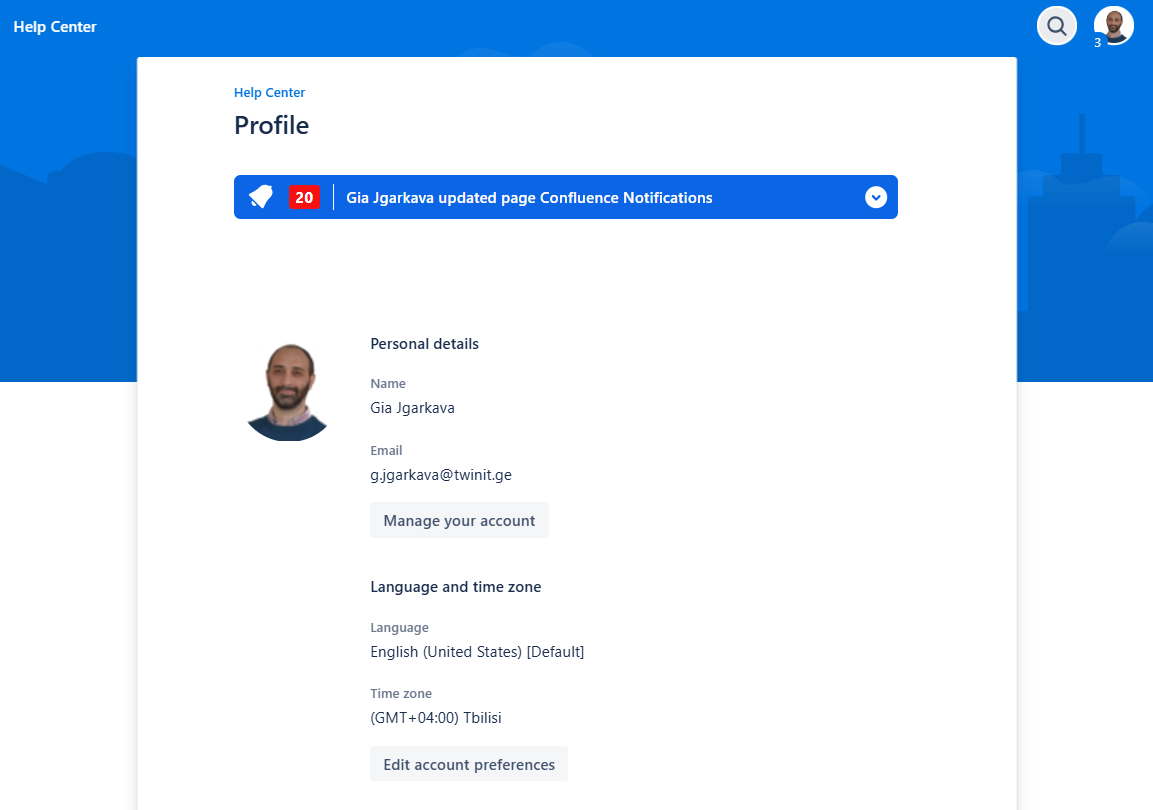
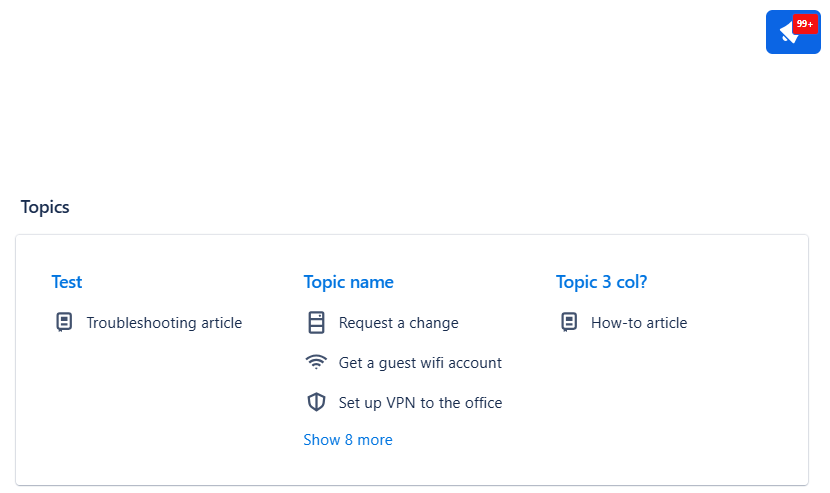
Placement: where the notifications bar will be shown outside the certain project:
Home page (of the customer portal)
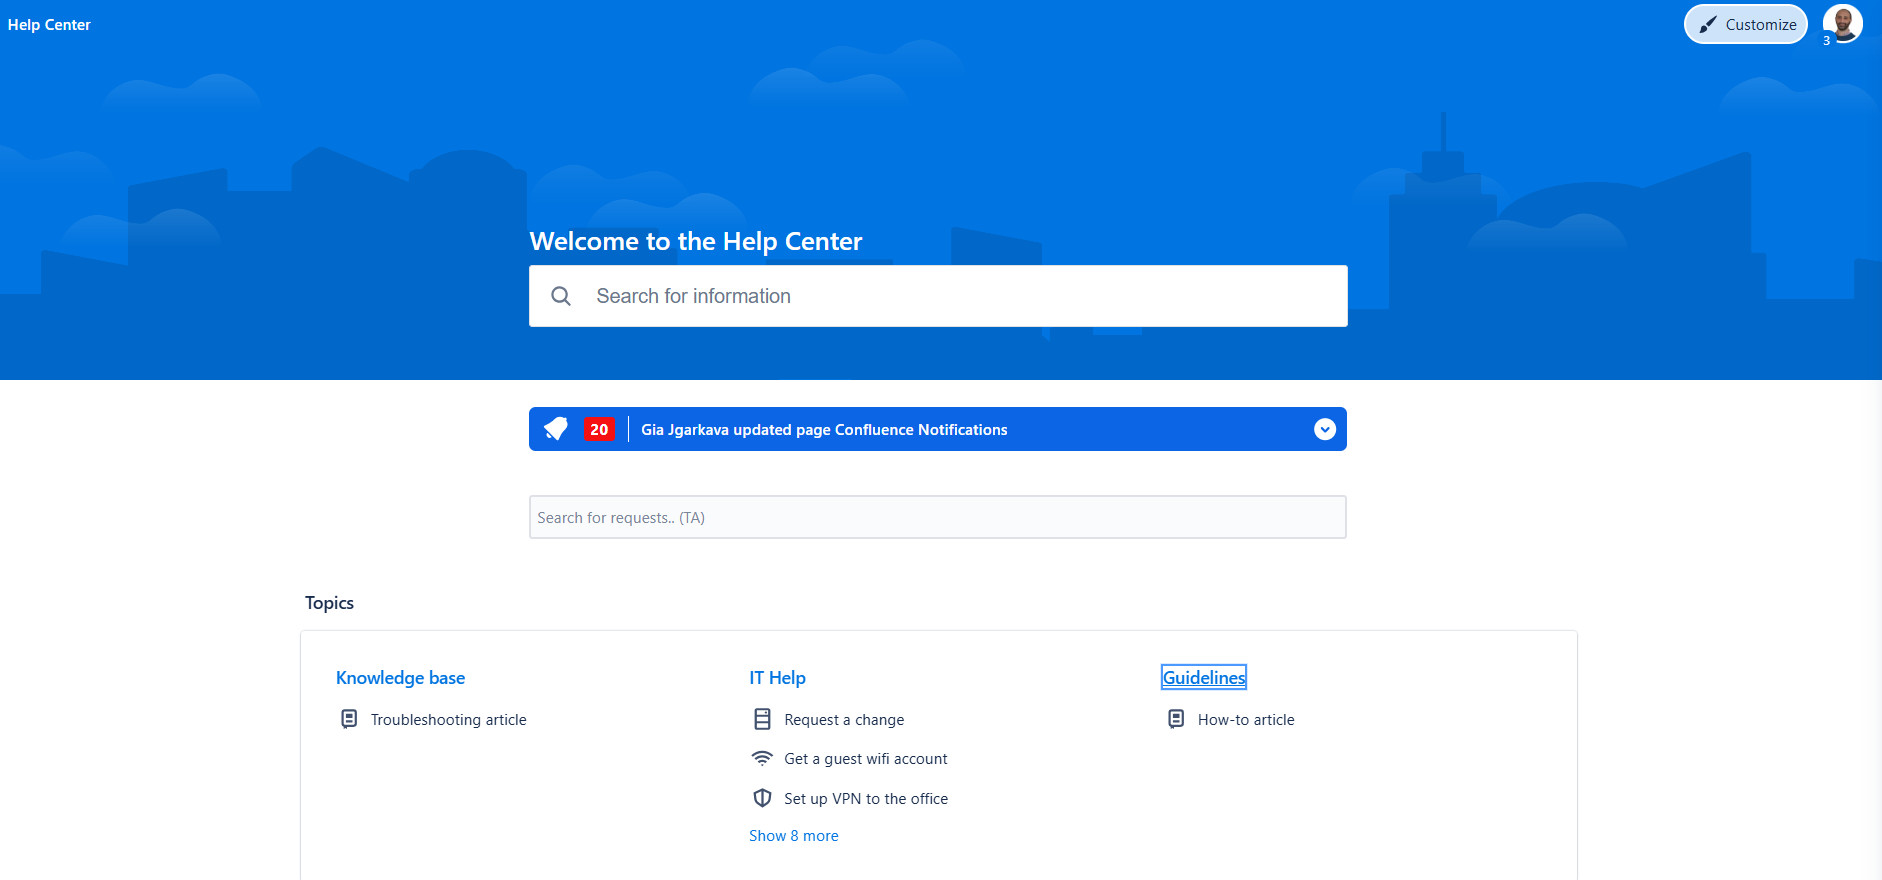
Requests / Approvals
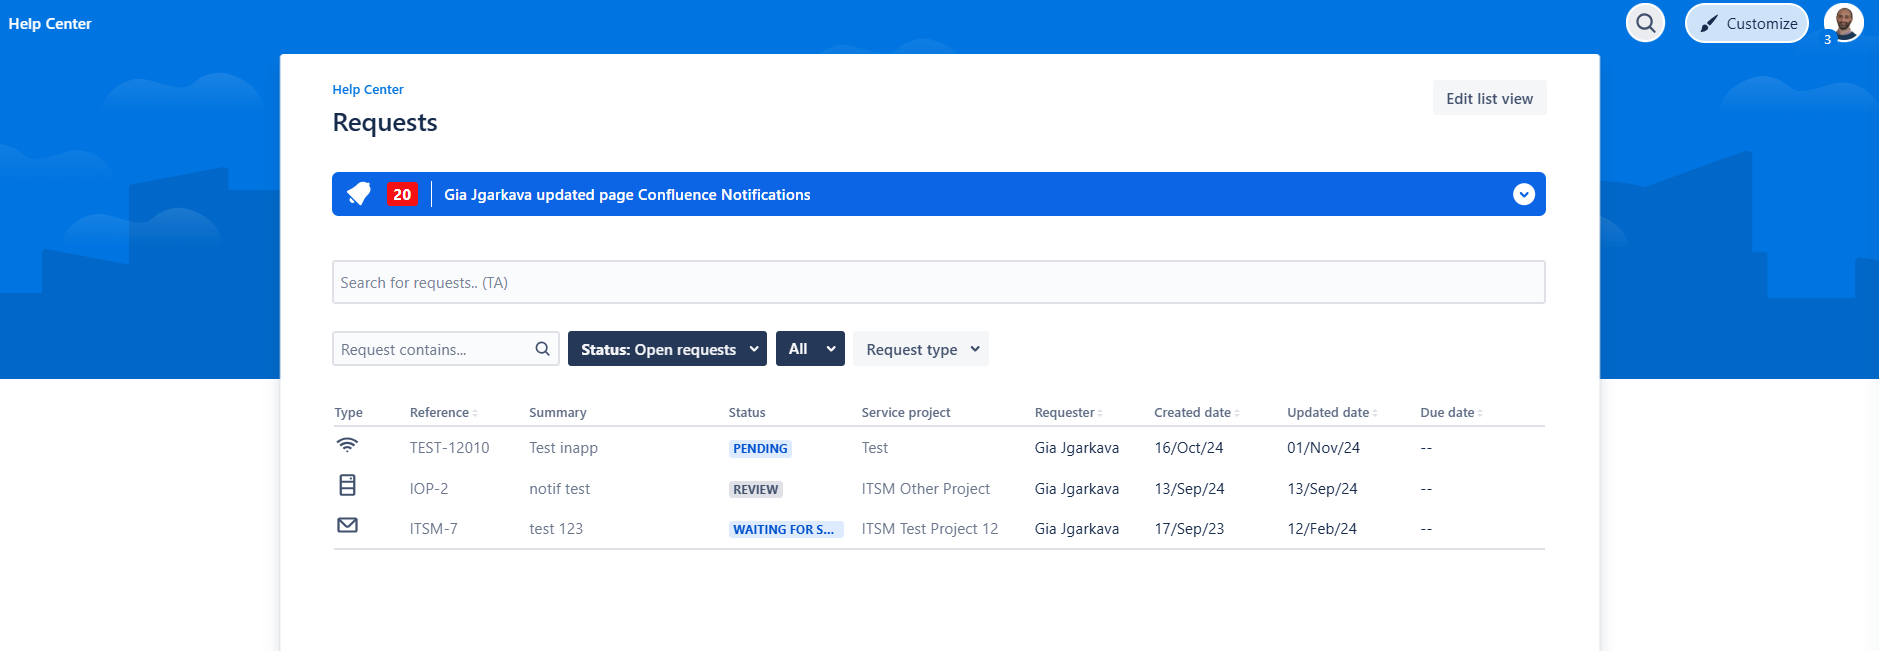
Created requests page
User profile
Date and Time Format
You can show the date and time in the User Guide in your desired format from the list of the available formats:
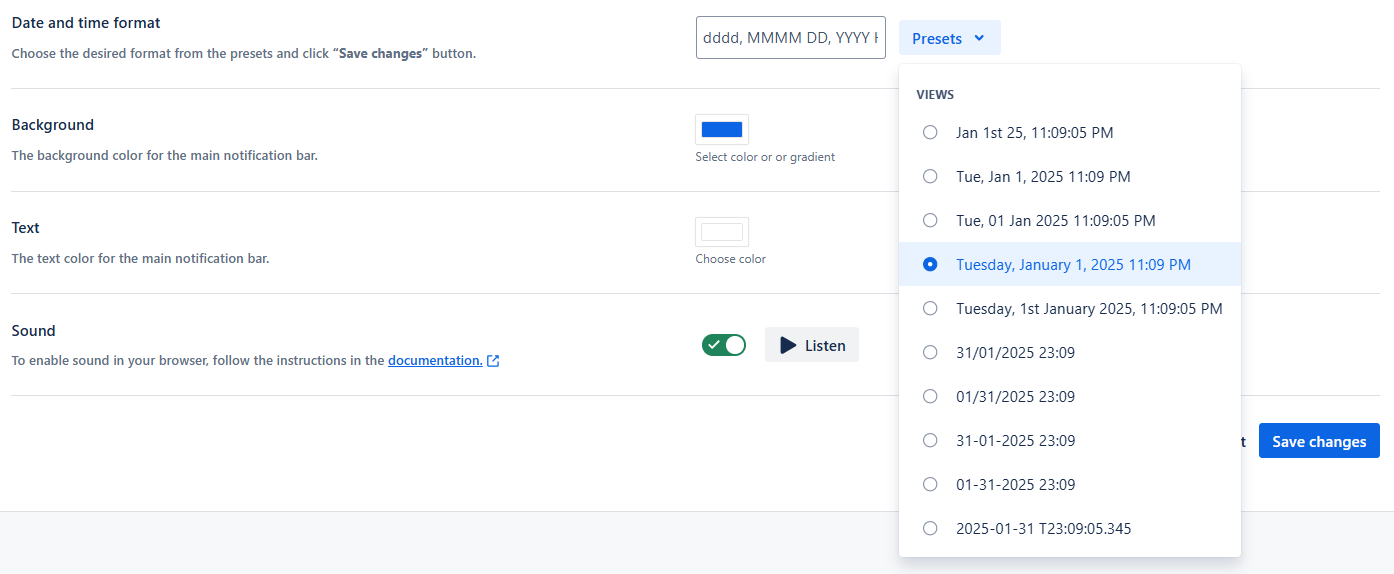
After rendering the desired format in the field, click the Save button.
Background and Text
By clicking Background and/or Text color, it is possible to define the colors for a notification bar:
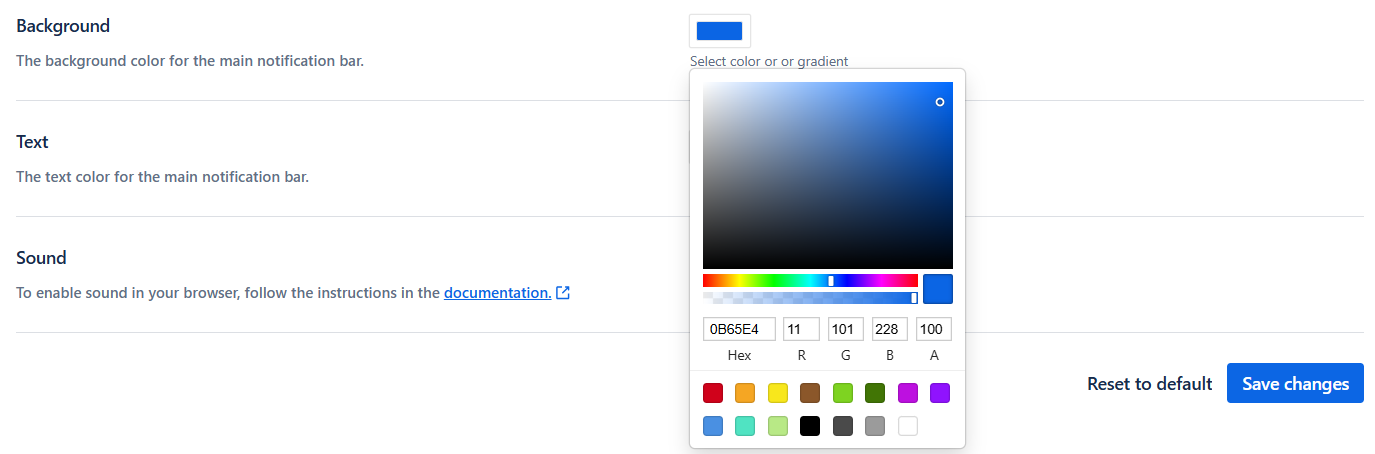
To turn the notifications sound on/off, toggle the “Play Sound” button.
To enable sound for the browser, refer to the section Configuration | Enabling Sound in Browser .
Default format is set to “DD.MM.yyyy HH:mm“ which corresponds to the following example output: “11.01.2023 15:56”.
Enabling Sound in Browser
In Google Chrome and Microsoft Edge browsers, additional settings should be configured to receive a sound alert when a notification arrives.
Mozilla Firefox does not need additional configuration and sound is enabled by default.
Google Chrome
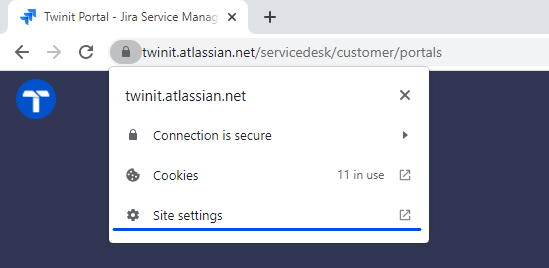
Navigate to your Atlassian instance page, click on the lock button on the left side of the URL, and navigate to the site settings:
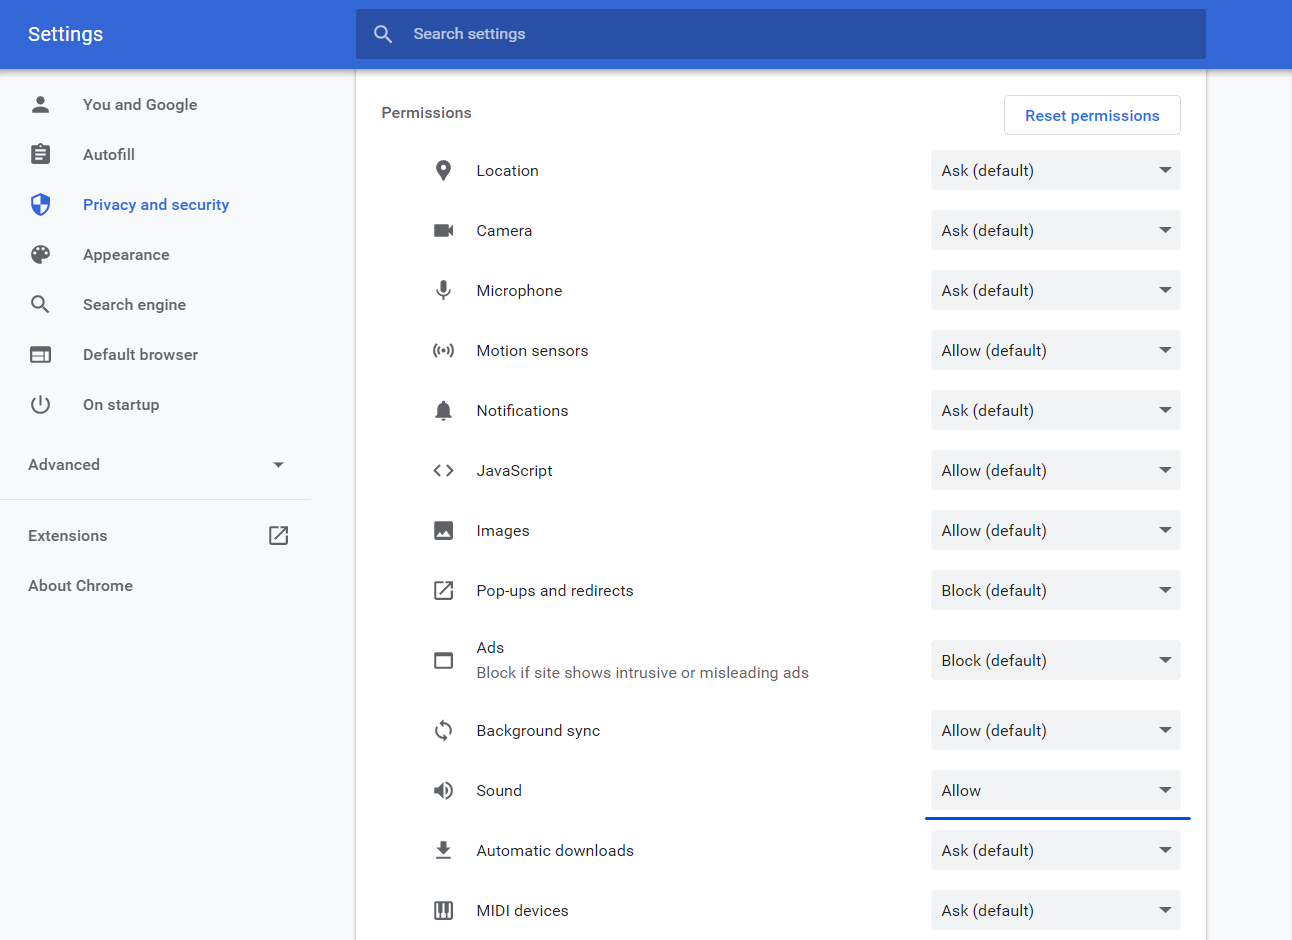
On the Permissions section, navigate to the “Sound” and select Allow from the dropdown list:
Microsoft Edge
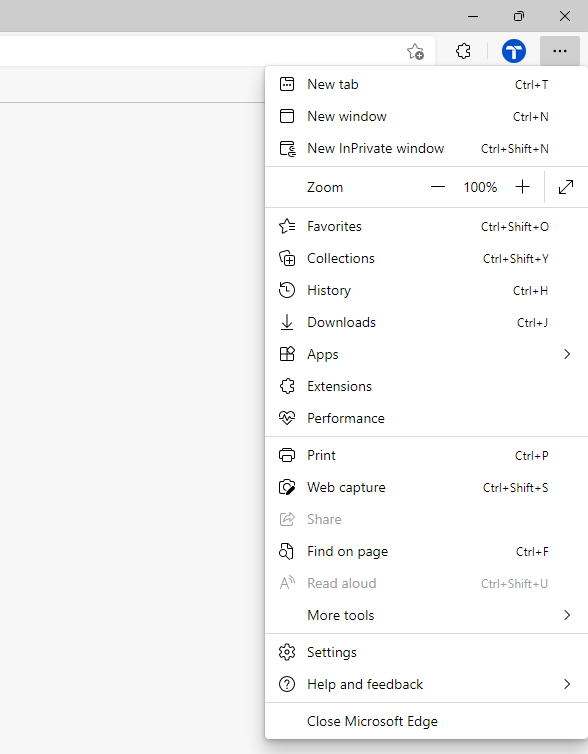
Go to the browser settings through the 3 dots button in the top right corner of the Edge browser:
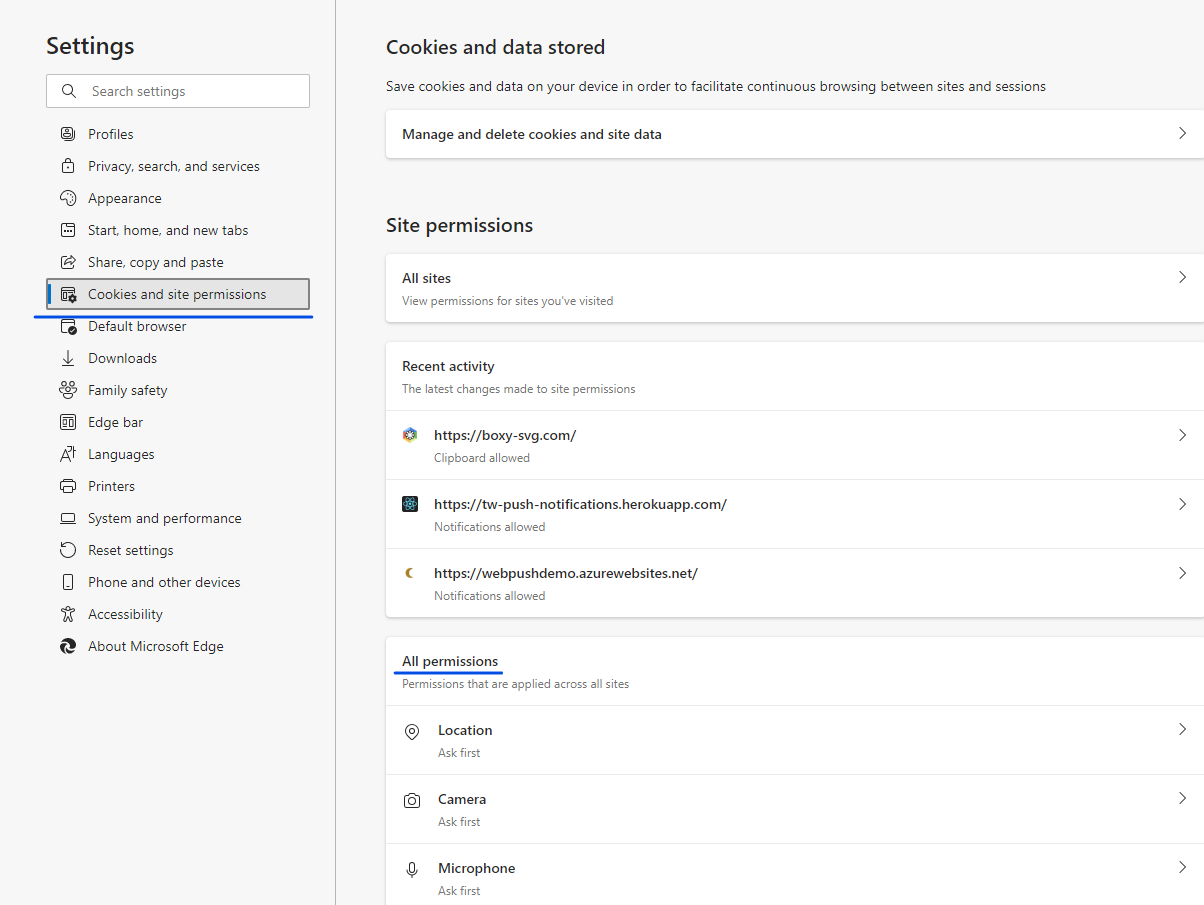
Go to the “Cookies and site permissions“ from the left menu and scroll down to the “All permissions“ section:
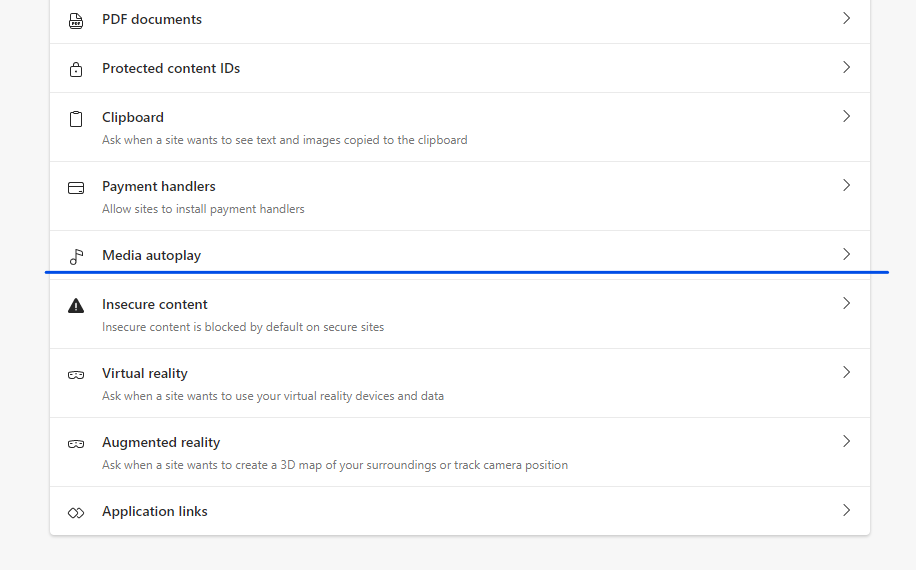
Scroll down to the “Media autoplay” section and click on it:
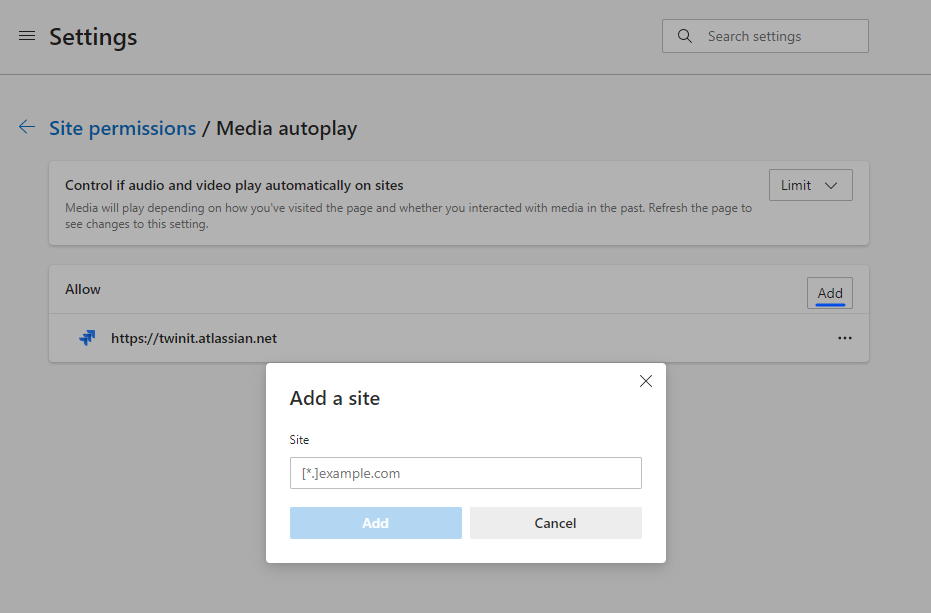
On the Media autoplay configuration page, click Add under the “Allow“ section, enter your Jira instance URL, and click Add:
Troubleshooting
If you encounter issues while configuring or using the Customer Portal Notifications app, here are some common problems and solutions:
Notifications Not Appearing
Issue: Notifications are not visible in the Customer Portal.
- Solution: Ensure that the notification bar is enabled in the configuration settings. Navigate to the “Display” section and verify that the “Show notifications Bar” toggle is turned on. Also, check if the correct request types are selected for the notification bar to appear.
Sound Notifications Not Working
Issue: Sound notifications are not playing.
- Solution: Check your browser settings to ensure that sound is allowed for your Jira instance. For Google Chrome, click the lock icon next to the URL, go to site settings, and allow sound. For Microsoft Edge, navigate to “Cookies and site permissions” and ensure media autoplay is allowed for your Jira URL.
Language Not Displaying Correctly
Issue: Notifications are not displayed in the preferred language.
- Solution: Verify that the preferred language is added and enabled in the “Languages” section. Ensure that all necessary translations are completed and saved. If the language is not available, the default language will be used.
Configuration Changes Not Saving
Issue: Changes made in the configuration are not being saved.
- Solution: After making changes, ensure you click the “Save changes” button at the bottom of the configuration page. If the issue persists, try clearing your browser cache and reattempt the configuration.
Notifications Not Sent to Specific Recipients
Issue: Certain recipients are not receiving notifications.
- Solution: Check the notification settings for the specific project and ensure that the intended recipients are selected. Verify that the “Exclude person who caused the action” option is not inadvertently excluding necessary recipients.
Browser Compatibility Issues
Issue: Notifications are not functioning correctly in certain browsers.
- Solution: Ensure that you are using a supported browser (Chrome, Edge, or Firefox). Check for any browser-specific settings that might block notifications and adjust them accordingly.
If these solutions do not resolve your issue, please contact https://twinit.atlassian.net/servicedesk/customer/portal/3/group/17/create/225 for further assistance.