Configuration
Managing rules (administrators)
Open the app’s configuration page, Better Search in Customer Portal (from Jira’s app management, Configure), then choose Linked work items in the left sidebar.
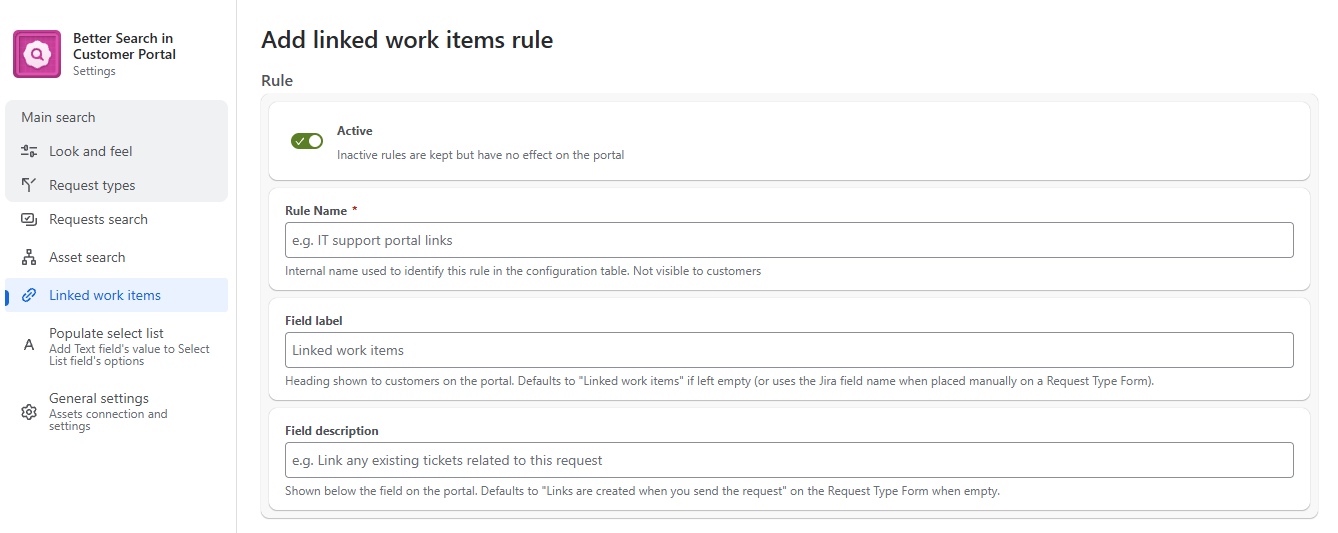
Creating a Rule:
- Click the button to add a rule. The Add linked work items rule form opens.
- Enter a Name and choose at least one Project
- Optionally limit the rule to some Request types.
- Choose the Placement method for the create form (see “Putting The Picker on The Create Form”)
- Switch on at least one Link type with at least one direction
- Set Permissions and, if needed, the Work items picker options
- Click Save configuration. A confirmation says whether the rule is active or saved as inactive.
Which rule applies? For a given project and request type, the app uses the first active rule in the list that covers both. A rule with no request types selected covers every request type in its projects. If you need a special rule for one request type, keep it above the general rule for the same project — or avoid overlapping rules altogether.
Rule Settings Reference
Rule
| Setting | What it does |
|---|---|
| Active | Inactive rules are kept but have no effect on the portal. |
| Rule Name | Internal name used to identify this rule in the configuration table. Not visible to customers |
| Field label | Heading shown to customers on the portal. Defaults to “Linked work items” if left empty (or uses the Jira field name when placed manually on a Request Type Form). |
| Field description | Shown below the field on the portal. Defaults to “Links are created when you send the request” on the Request Type Form when empty. |
Where to Display
| Setting | What it does | Default |
|---|---|---|
| Projects (required) | Service management projects the rule applies to. Changing projects clears the request type selection. | — |
| Request types | Limit the rule to specific request types. Leave blank for all request types in the selected projects. | All |
| Placement method | Where the picker appears on the request create form: Automatic (bottom of the form) or Manual (Jira form builder). (see “Putting The Picker on The Create Form”) | Manual |
Link Types
All link types of your Jira site are listed. Switch on the ones customers may use. Each enabled link type shows its two directions (for example blocks and is blocked by):
- Untick a direction to hide it from customers.
- Type a Portal label to reword a direction for customers (e.g. “is blocked by” > “Waiting on”). Leave it empty to use Jira’s wording.
Only links of enabled types and directions are shown or can be removed on the portal.
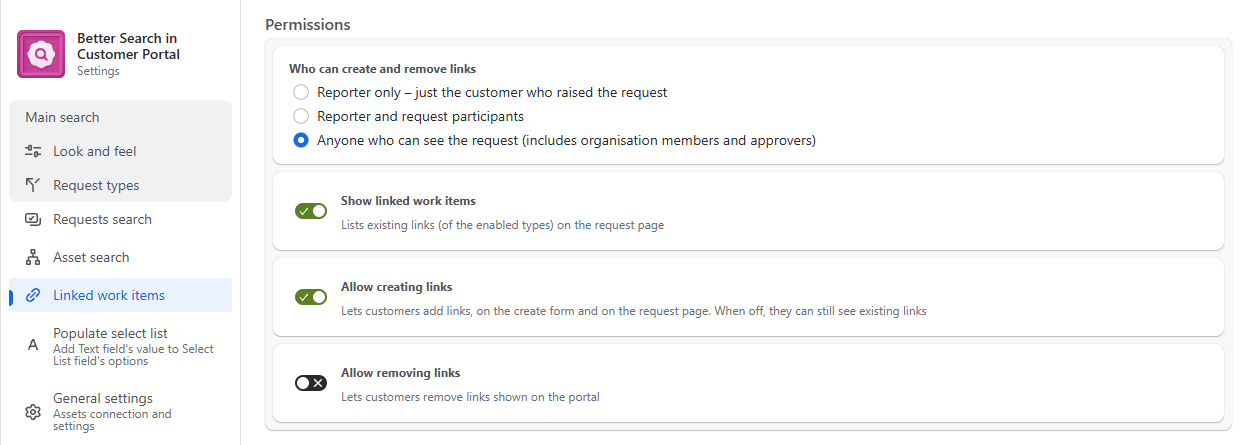
Permissions
| Setting | What it does | Default |
|---|---|---|
| Who can create and remove links | Reporter only — just the customer who raised the request. Reporter and request participants. Anyone who can see the request — includes organization members and approvers. | Anyone who can see the request |
| Show linked work items | Lists existing links (of the enabled types) on the request page. | On |
| Allow creating links | Lets customers add links on the create form and on the request page. When off, they can still see existing links. | On |
| Allow removing links | Lets customers remove links shown on the portal. | Off |
Work Items Picker
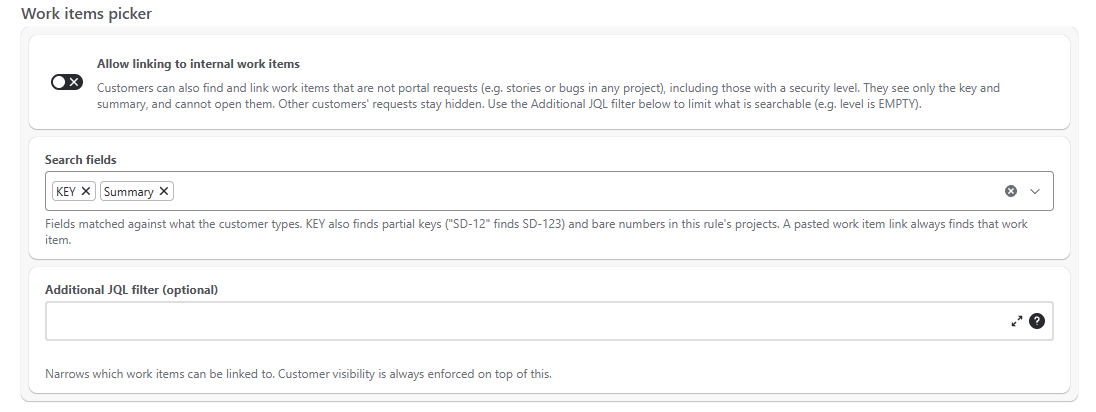
Allow linking to internal work items:
With this setting on, portal customers can find and link Jira work items that are not portal requests, such as stories and bugs in other projects. They see only the key and summary, and cannot open those items.
| Setting | What it does | Default |
|---|---|---|
| Search fields | Fields matched against what the customer types: KEY, Summary, Description and custom text fields. KEY switches on work item key search (see section 7). If you clear all fields, KEY + Summary are used. | KEY, Summary |
| Additional JQL filter (optional) | Narrows which work items can be linked to, e.g. statusCategory != Done. Edited with Atlassian’s JQL editor; a rule with invalid JQL cannot be saved. Customer visibility is always enforced on top of this. |
Empty |
Good To Know:
Other customers’ requests are never shown. Internal items show without a status, and their key does not open anything. Security levels are not checked. Use level is EMPTY to hide restricted items. The app needs Browse Projects and Link Issues permissions in the projects involved. Turning the setting off keeps existing links in Jira but hides internal items from the portal.
Putting The Picker on The Create Form
The create-form picker only appears when Allow creating links is on. Choose one of two placement methods on the rule:
| Method | How it works | Use it when |
|---|---|---|
| Automatic (bottom of form) | The app adds its picker panel at the bottom of the create form of every request type the rule covers. Nothing to configure in Jira. | You want the quickest setup and the bottom of the form is fine. |
| Manual (Jira form builder) | The app adds nothing by itself. You add the Linked work items (Better Search) field to each request type’s form in Jira, at any position you like. | You want to control where the picker sits, or show it only on some forms. |
Setting up Manual placement
When Manual is selected, the rule form shows a Request types table with a status for each request type the rule covers (e.g. “2 of 3 configured”):
| Field status | Meaning |
|---|
| Field status | Meaning |
|---|---|
| Configured | The Linked work items field is on this request type’s form. |
| Missing | The field is not on the form yet — customers will not see the picker. |
| Unknown | The status could not be checked. Use Refresh status to try again. |
- Click Edit form next to a request type. Jira’s request form editor opens in a new tab.
- Add the Linked work items (Better Search) field to the request form and place it where you want. Save the form in Jira.
- Return to the app’s tab. The status refreshes automatically when you come back; you can also click Refresh status.
- Repeat for each request type showing Missing.
The field’s label on the portal is the field name Jira shows (not the rule’s Title). If the field is on a form but no active rule covers that request type, customers see “Linking work items is not available for this request type.”
With Automatic placement, if a request type’s form already contains the Linked work items field, the bottom panel hides itself so customers never see two pickers.